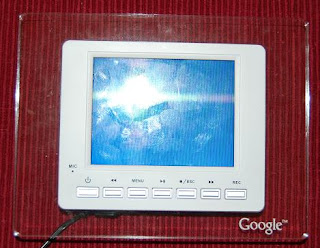
I recently got a GTA-316 digital photo frame (I know, about three years later than most people) and after installing my first set of JPG images it turned out that it had crashed, because the first JPG was not in a format it liked. This problem was permanent: when you turned the device on, it would immediately load the picture, try to display it, and fail. All it would show was a blue screen (see figure 1), and none of the buttons would work anymore (not even the one that turns it off). Basically it turned into a paper weight. I was planning to use the LCD screen for my own purposes, but I was not going to let a software error like this get the better of me either. I fixed the problem, and here is how I did it.
Warning/disclaimer: this procedure involves messing with hardware. It is unlike to cause problems, but I do not guarantee anything. Your results may vary. The GTA-316 might stop working forever. The computer attached using the USB might blow up. If the USB connection has issues, you might get an electric shock. In other words: do the following steps at your own risk.
If this fix worked for you, or does not work for you, or if you have an easier way to fix it, please let me know. I welcome comments.
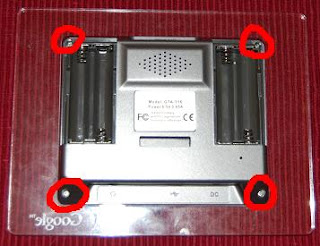
First I opened the GTA-316. This is relatively simple, there are four screws (two hidden behind the battery panel). Figure 2 shows you how to access these screws. You'll need a very small screwdriver to unscrew them, but it is easy. I had to use a magnet to find the screws afterwards, so be prepared to store them somewhere safe. It is best to remember how you take things apart, so you can put it back together more easily later.
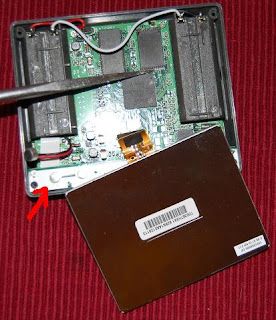
Once open, lay out the components as shown in figure 3. You can detach the front panel and the plexiglass completely, the front panel holds a microphone, but this is rather loose. Now you need to follow the following steps:
1. Use a large pointy metal object and scrape a few times along the address lines of the EEPROM inside the GTA-316 (see picture) to remove any coating.
2. Connect the USB of the computer to the GTA-316.
3. Press the "on" button of the GTA-316. This is marked in the picture with a red arrow.
4. Wait until the cute and compression distorted animation starts.
5. Press the large pointy metal object against the address lines of the EEPROM inside the GTA-316 (see picture) to short circuit them. Hold it there until the display shows an error message ("PICTURE FILE ERROR" or something like this). If this message does not appear, but instead the blue screen appears, read the next paragraph.
6. Remove the large pointy metal object.
7. Your computer should now recognize the GTA-316 as an unformatted USB drive.
8. Allow the computer to format the drive (this gets rid of your bad JPG files). If instead the computer shows the folder with the bad JPG files, delete them.
9. Use the "safely remove hardware" option of your computer.
10. Disconnect the GTA-316.
11. The GTA-316 should now be in working order. Make sure you follow the instructions and use the included conversion program (or hints on other websites) to ensure no bad JPG files make their way on the GTA-316.
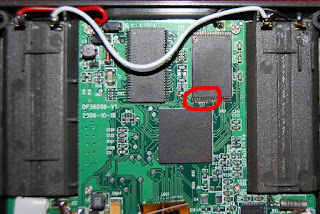
In case the GTA-316 gives a blue screen instead of an error message you did not touch the correct lines. Sadly I was unable to find a data sheet of the particular chip, and I pressed the object randomly against the lines. Circled in figure 4 are is the area where most address lines are located, which gives you the highest chance of success. I had to do it four times myself. Make sure the pins are properly scraped and the metal object is not greasy. In case you get the blue screen, disconnect the USB and start again at step 1 in the paragraph above.


