maandag 13 augustus 2012

The tweeting cat IV


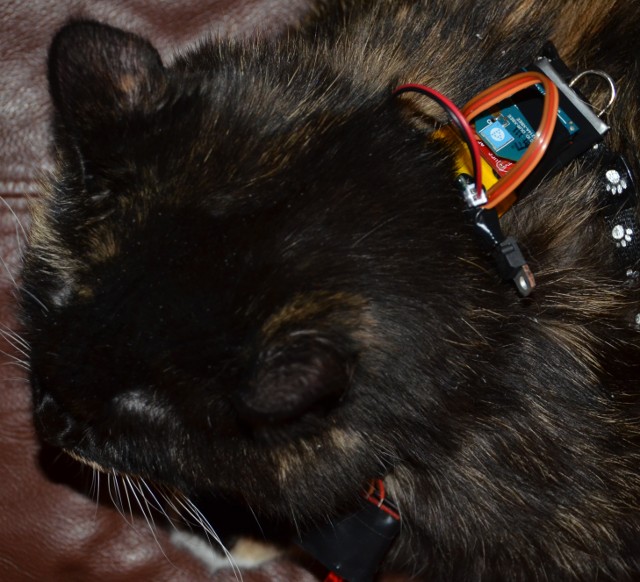
The system is now finished. The full version displayed above, and the twitter stream is available at NephthysCat. Of course she's not wearing the harness all the time so don't expect constant updates. The battery life is longer than the calculated 7.1 hours, which was to be expected because I didn't expect the components to run at their maximum rating the whole time.

I solved the charging of the LiPoly battery by cutting a USB cable in half and using that power for the input of the charger circuit. On the Playstation 2 I have the cu command (cu -s 9600 -l /dev/ttyUSB0 dir >entry) run in a local terminal. This will cause all the incoming messages to appear in the file "entry":

4F0088E27B5E
4F00889B0F53
4F00890403C1
4F00890403C1
4F00889BD78B
4F0088DC2932
4F0088DC2932
4F0088DC2932
4F0088DC2932
4F0088DC2932
4F0088DC2932
4F0088DC2932
4F0088DC2932
4F0088DC2932
4F0088DC2932
4F0088DC2932
4F0088DC2932
4F0088DC2932
4F0088EE88A1
4F0088EE88A1
4F0088EE88A1

A simple pike program keeps track of which line we are in this file, and continues from there. If an entry gets added beyond that, it will a message read from a file called "tweets". Here is the code:

/* NEPH.PIKE - Allow Nephthys to tweet */
/* 110812: Started programming */

#pike 7.0

#include

mapping(string:string) tweets = ([]);

int main() {
  string data = Stdio.read_file("tweets");
  string *lines = data/"\n";
  for(int i=0;i
    tweets["0"+lines[i]]=lines[i+1];
    tweets["1"+lines[i]]=lines[i+2];
  }
  string current = Stdio.read_file("current");
  int where = (int)current;
  write("Last index: " + where + "\n");
  int count = 0;
  while(1) {
    string entries = Stdio.read_file("entry");
    lines = entries/"\n";
    if((sizeof(lines)-1)>where) {
      tweet(lines[where++]);
      Stdio.write_file("current", "" + where);
      write("New index: " + where + "\n");
      count = 0;
    } else {
      if (count++ > 60) {
        //tweet("Purr!");
      }
    }
    write("Sleeping...\n");
    sleep(60);
  }
}

void tweet(string text) {
  text-="\r";
  text-="\n";
  string last = text[(sizeof(text)-2)..(sizeof(text)-1)];
  string code = "" + random(2) + last;
  string message = tweets[code];
  if (!message) {
    message = "Cat error " + code;
  }
  write("Tweeting: " + message + "\n");
  system("/usr/local/bin/ttyter -keyf=nephthys -status='" + message + "'");
}


The code doesn't filter out duplicates, but fortunately twitter does this for you. It uses the ttyter command line to send the tweets. The tweets file contains the last two digits of the tag, followed by two possible tweet lines which it can choose from at random. For example:

32
Nom, nom, nom!
Oops, I dropped a piece of food. No worries, Miuty will get it.
A1
This is smelly tasty food from the top shelf.
This food is better because it is higher.

The tags are placed at crucial positions in the house, for example near the cat toy.


There are obviously many improvements that can be added, and more tags that can be spread around the house.

vrijdag 10 augustus 2012

The Tweeting cat III


The new version uses a LiPoly battery, which outputs 3.7V. Since the 33V requires 4.6V input, I left that circuit untouched, and instead moved the 3.7V from the LiPoly battery into a 5V DC to DC Step Up circuit. The resulting circuit is a lot smaller (as you can see in the picture). Initially there was a problem with the circuit not working, but it turns out that there is an open (and unsoldered) jumper that disables the entire thing. After moving the battery connector to this jumper and adding a ground wire the thing worked fine.

I hooked it up and it also notified the laptop when Nephthys was eating, I even got three messages, each time she lowered her head to the food bowl. The next step is to write the playstation 2 code, where I'm planning to just have cu (the terminal emulator) running in the background writing to a file, which the pike application will read from and send messages to ttyter which sends them to twitter. I decided to stick with cu, because despite my device driver coding the USB system is still quite unstable, and opening and closing the port repeatedly (which will happen if I start writing my program for it) could cause it to crash.

Another aspect is charging the LiPoly battery, I have a circuit for that but it gets rather hot (mostly because my input voltage is 12V). I'm looking for a more efficient input, but probably will use a USB port for this.

maandag 6 augustus 2012

The tweeting cat II

I managed to get the XBee USB explorer hooked up to my playstation 2 linux system, and it only crashed twice so far. Playstation 2 linux runs 2.2.1 (a very old release). Since 2.2.1 doesn't have USB and the Playstation 2 uses USB for the keyboard and mouse, they ported the 2.2.18 USB modules, but the driver for the XBee USB explorer only exists in 2.2.19 and up, so I had to port that back too. It required me to manually edit usbserial.c (as this contains PS2 specific code) but the other files could just be copied from 2.2.20 and 2.2.19.

The next step was to build the circuit. I saw a good option on bildr blog which I decided to persue:
I also added a 330 Ohm resistor and a LED to the ID-12, to make sure you could see when a tag was successfully scanned. The positive lead of the LED goes to the pin, for those that are wondering. As a battery supply I used four rechargeable NiMH AAA batteries, which give a voltage between 5.6 and 4.9 volt, I initially used a diode to drop the voltage by 0.7V to ensure that I didn't send more than 5.4V to the ID-12 (the XBee is protected by the 3.3V converter).

Then I had to attach it to a cat harness, for which I used electrical tape and band aid tape (to not bother the skin of the cat with the electronics). This is what Nephthys looks like with the system on:


You can see the LED and the RFID-12 on this picture.


And on this picture you can see the battery pack with the XBee attached to the back.

The system worked once, but the cat decided not to go after any of the RFID tags I put around the house and the system stopped working after an hour. After a lot of debugging I discovered this was because the batteries had run out of power (oddly enough the RFID-12 and the XBee still work, and the LED still blinks, but the RFID-12 refuses to send any data to the XBee, which made for a lot of trouble debugging. So I'll try the system without a diode next, which would give the system a lot more battery life.

As you can imagine, I'll put tags on the food bowls, the water bowls, the favorite sitting spots of the cat, maybe the litter box, but also the other cat, Miuty:


Of course, I'll also have to set up a twitter account and create a way to translate the RFID numbers into tweets. But it will all happen.

woensdag 25 juli 2012

Cat tweeter, order placed

Hi - your order is ready to ship!

SparkFun Electronics Order

Date Packed: 07/25/2012

Shipping Method: UPS Ground

Items shipping in this package:

Breakout Board for XBee Module x1
Logic Level Converter x1
Voltage Regulator - 3.3V x1
2mm 10pin XBee Socket x4
RFID Tag - 125kHz (retail pack of 5) x2
RFID Reader ID-12 (125 kHz) x1
RFID Reader Breakout x1
XBee 1mW Chip Antenna - Series 1 (802.15.4) x2
XBee Explorer USB x1

This is for my new tweeting cat project. The plan is to hook up the RFID Reader ID-12 to the XBee Series 1, and send data to the other XBee Series one which is hooked up using the XBee Explorer USB to my playstation 2, which will send tweets based on where the cat is. I'll put the RFID tags on the various places that the cat goes (drinks, litter box, other cat, cat toy, sleeping place, doorway, food bowl, et cetera). Biggest concern are the batteries, but I'll figure out what to do with that. Most likely it will need a harness to avoid the cat being entangled in wires, and to avoid the RFID chip getting into the water bowl.

dinsdag 10 juli 2012

High definition digital antenna

For some time I wanted to build an antenna for my high definition television. When the AT&T U-verse system stopped working, I decided now was the time. I was subscribed to Make magazine for a while, and they had a good description of a possible antenna. I had already bought the "75 to 300 ohm matching transformer with spade clips on one end and female F connector on other" so it was just a matter to put things together. I didn't want to waste clothes hangers, and I didn't have a nice piece of wood, so I went a step cheaper by using cardboard tape and European grounding wire. I connected the wires by twisting them together with pliers. The result is visible in the picture on the left.


On this picture you can see most of the back side, including the way I twisted the wires. I used black dots to mark the places where the screws would've been on the original, as you can tell, one of the wires slipped a little bit. I hooked the transformer up using European screw blocks, of which I removed the plastic to ensure better contact. The total price of this antenna was less than $5, although I hooked it up to the television using an expensive gold plated antenna cable that was over $50.

Making sure the television understood the input was from an antenna and not from cable and to scan for all the stations was slightly tricky to figure out, but after it had discovered two channels I knew it was working. In the end it found over 60 channels, all local, of which most are Asian for some reason.

Below a picture of the television screen using the antenna. As you can see it provides a flawless 720p high definition signal from KTVU-HD. My apologies for the camera flash.


woensdag 30 mei 2012

Phone charger for bicycle

The latest project I made was the USB port for my bicycle. I had the circuit ready a while back, but I hadn't moved my Nexus in-hub alternator to my new bike yet. The Google bike to work day made that easy, as they had a bicycle workshop where they were quite helpful and making the change (I couldn't do it myself due to lack of a good tool to undo the old wheel: it had been tightened a lot).

Initially my circuit had only a 10uF capacitor after the diode bridge, this turned out not to work and confuse the phone a lot. After increasing this to 230uF by adding a 220uF capacitor everything worked well, but a 470uF probably works even better.

Here you can see the circuit actually attached to the bike (using electrical tape for insulation). You can see the Nexus wheel at the bottom and the USB connector with the plug heading to the phone. As you can see there is one wire hanging loose, this is the ground wire, which is not needed as the alternator itself is already grounded to the bicycle. I prefer to leave it disconnected to avoid ground loops, although it is unlikely this will happen.

There is also a switch, shown here from the side, which allows you to turn off the circuit (which will make it easier to cycle, as there is hardly any resistance from the in-hub alternator if there is no draw) or switch the power directly to the front light of the bicycle, which was the original configuration.

The final question is whether it works, and it does. The first trip I got 2% charge (from 28% to 30%) the second trip 5% (from 90% to 95%) and the third trip 8% (from 66% to 74%). This is while the phone is operational (and actually syncing Email in the Mountain View WiFi area).