vrijdag 25 november 2022

Mosha Eurorack Modules #10: I/O Module (Head phone output and MIDI input)


The I/O Module is a 6 HP module that provides some input and output facilities. The black knob is a double potentiometer that controls the left and the right channels. If a cable is plugged into the gold jack it will be either the left channel or both channels, and a cable plugged into the purple jack will be the right channel. The output is a TRS jack with the black dial controlling the volume. It uses two NE5532 OPAMP, one for each channel. The input voltage is divided by 5 using a resistor network. Because a dual voltage system is used, there is no output capacitor to normal the voltage.

The bottom six jacks are all MIDI related. The MIDI input is fed to the board from the rear of the box using a special conversion circuit (shown below. The 10k resistor in this circuit is essential and occasionally missing in online versions of this circuit). The optocoupler prevents ground loops through the MIDI cable and is required by the MIDI protocol for receiving data. There are two headers on the module, one to provide power to this circuit and one to transfer the MIDI signal to the PIC16F690 that is used to convert the MIDI.

The PIC16F690 was chosen because it has an USART (for MIDI) an analog input and a PWM that can be used as an analog output, and it can be programmed by the PICkit 2. The MIDI outputs are, in order: CV out for MIDI notes played on channel 4. The gate signal of these MIDI notes. The clock signal of the MIDI, and three drums from channel 10. The source code for the MIDI is available here.

To ensure a quick response to frequency changes the PIC16F690 is running at 20Mhz, which also allows 10-bit accuracy. There's a two pole active filter to prevent the PWM signal from interfering with the output, and a small trim potentiometer that allows setting the output voltage from 1x to 2.1x (10k with 9.1k non-inverting OPAMP, which may not be enough).


woensdag 23 november 2022

Mosha Eurorack Modules #9: Double Mixer


The double mixer is a 6 HP module that, as the name implies, has two mixers: a golden one and a purple one. As usual, round jacks are inputs, and hexagonal ones are outputs. The golden mixer has two inputs, one that can be attenuated and one that is fixed. It also has one non-inverting output. The circuit is basically an inverting OPAMP for the mix part, and a second OPAMP to invert the signal again. The jack has +5V by default, so the mixer can be used to provide a 0V to 5V signal if it isn't used for anything else.

The purple mixer has all the features of the golden mixer, but in addition it has a third input so it can mix three signals together, and it has an output at the inverted stage. This means it can be used to provide both a 0V to 5V signal and a 0V to -5V signal if no other signals are mixed. It can be combined with the golden mixer for a 0V to 10V and a 0V to -10V signal, if desired.

maandag 21 november 2022

Schematic of the Decay and the Metallic oscillator

 Turns out I had a schematic made of the decay, which is included here:


As well as one of the metallic oscillator, which is here:


zondag 20 november 2022

Mosha Eurorack Modules #8: Drum Module


The Drum Module is a 6 HP module with 4 different sound generators. The silver knob is for metallic sounds, with 5 separate oscillators. The knob controls both the decay (middle is highest decay) and filter (right is highest filter) of the sound. Each time a cable is plugged into the jack it will randomize the oscillator values, so the sound can be changed by replugging the cable.

The black knob is for a noise generator adding short bits of noise to other drums. Again the knob controls both decay and filter. The two gold knobs are for the two tom drums. The knobs control the pitch, whereas the purple knob controls the decay of the two toms (making one shorter makes the other longer). There is one output jack at the bottom, and four trigger jacks above it.

The circuits for each of the drums are different. The silver knob uses a PIC10F206 to generate the sound (source code). One of the pins of the PIC10F206 powers an one-transistor inverter with a capacitor, which allows a very clean decay to occur. This is then pushed through a TL074 OPAMP for both filtering and buffering, and then moved to a final inverting amplifier that sums the signals of the four drums with a 100k Ohm input. Since the metallic sounds can be quite loud there's also a trim potentiometer to adjust the level.

The black knob uses the standard noise circuit of the beat box instructable. There is a separate OPAMP to amplify the result. The decay is done using a JFET with a circuit from squarewav. This is not the best circuit, even with careful selection of resistors the decay is cut off rather early.

The tom drums are based on the simple twin T-drum design from Krakenpine. It was simplified even more by removing the tone and distortion parts and not massaging the input signal (because it will always come from the drum sequencer).

zondag 13 november 2022

Mosha Eurorack Modules #7: Drum Sequencer


The drum sequencer is a 6 HP module that sequences drums. It was intended for the drum module, but could be used for anything that needs a fixed pattern of gates over a 15 or 16 step period. There are 8 outputs, each with a different rhythm. There are lights behind the jacks that show the pattern before a cable is plugged in. This makes it clear which plug is which pattern, but avoids additional power use while the pattern is used.

The patterns themselves are chosen using a switch. In the middle position it will use the standard 16 beat patterns. In the down position it will use the standard 15 beat patterns. In the up position it will randomize the patterns once, and then use the randomized patterns. This pattern is stored in memory, so after a restart the pattern will remain the same.

There is one input, which is the clock. This determines the speed at which the beats happen. Beats can happen on clock up and on clock down, which means that the outputs can be twice as fast as the inputs when needed.

There is an ICSP connector at the back that allows the rhythms to be changed. The circuit is exceptionally simple: it is a 16F684 and all gates are connected using a 1k resistor. It therefore relies on the diodes in the PIC16F684 to prevent damage, but this generally isn't a problem.

The source code is available here.

zaterdag 12 november 2022

Mosha Eurorack Modules #6: VCF


The VCF is a 6 HP module that has an LM13700 based filter using a mixture of designs by Look Mum No Computer, RĂ©ne Schmitz and Moritz Klein. It is nearly 1V/oct, but not quite, but the voltage control circuit is simpler than most. There is a -12V to 12V offset that can be added manually to the CV input, and a separate knob for resonance. There are two inputs. The entire VCF part is using the gold colors, the purple colors are a separate filter that isn't voltage controlled, but uses a two-colored LED for a more gritty response in the feedback loop. It also uses 10nF instead of 1nF capacitors.

A full circuit diagram is included in this blog post, however, this may not exactly match the built version and there may be errors in it. Although multiple circuits suggest to use the buffers internal to the LM13700 there is some trouble making sure that they are offset correctly, and it is therefore easier to use the TL074. This also provides a cleaner sound. 


vrijdag 11 november 2022

Mosha Eurorack Modules #5: VCO


The VCO is a 6 HP module that has a CEM3340 based design. The first input is the linear FM input. The gold input is the 1V/oct (which can be controlled with the golden knob). The third input is the soft sync. The purple input is the PWM modulation, which can be attenuated with the bottom knob and separately controlled with the middle knob. From top to bottom the outputs are the sawtooth wave, the pulse wave and the triangle wave. The sawtooth wave is at 10Vpp the other waves are louder and softer (they are buffered, but not amplified copies from the original CEM3340 output).

The design of this is a mix. It uses the basic and advanced schematics from Look Mum No Computer, the variety of schematics on the electric druid site, and the schematic from Non-Linear-Circuits.

As you can see, there is only one input (which may have been a mistake) there is no high frequency tracking. When in doubt, the design choses the simplest solution, however, the FM input and sync input were kept.

donderdag 10 november 2022

Mosha Eurorack Modules #4: Double VCA


The double VCA is a 6 HP module that has two VCA circuits and a mixing circuit. The two VCA (gold and purple) are identical and organized vertically. The VCA level is only controlled by CV, the knobs are part of the mixer that mixes the VCA with a third input.

The circuit is based on the vintage VCA of electric druid. It uses the "more practical current source" as described there, since no mixing of current sources is needed.

The mixer is a simplified version of the Doepfer A-100 do-it-yourself page. It doesn't have the part that inverts it back to normal and it doesn't have an offset voltage. In fact, it doesn't even have a knob to control the volume of the third input.

woensdag 9 november 2022

Mosha Eurorack Modules #3: Attack/Release and Decay


 The Attack/Release and Decay is a 6 HP module, that, as the name implies, as an Attack/Release section and a Decay section. The output voltage is 8V to 0V. The Decay (in purple) accepts either triggers or gates as inputs, the Attack/Release (in gold) section requires a gate input.

There are are knobs to control the Attack, Release and Decay, and two red LED indicating the current voltage on each. There is also a single CV input for the Attack/Release section. A positive voltage will affect the Attack (the higher the voltage, the shorter the attack) and a negative voltage will affect the Release (the lower the voltage, the shorter the release). At 0V the CV doesn't influence the outcome.

The circuit diagrams shown are mostly used for the simulations, the actual diagrams are slightly more complicated. However, they give an idea on how things work. The Decay takes the gate input which is low-pass filtered by a large capacitor and a potentiometer. A diode prevents it from triggering negative voltages and the output is buffered. There is a second buffer for the LED.

The Attack/Release circuit diagram is even less complete, as it doesn't show how the potentiometers are individually connected to the outputs of the microcontroller in order for them to be controlled separately. 

In order to ensure that there is a clean input for both the Decay and the Attack/Release there is a PIC10F206 microcontroller that accepts the messy input signal and cleans it up. For the Decay this means converting a short trigger into a longer gate output and ensuring that the capacitor is discharged quickly (over a 100 Ohm resistor) when the signal needs to be reset. The source code is here for the Decay and here for the Attack/Release.

The reason for a micro-controller solution was to have more control over the outputs and how they work. However, a solution using an OPAMP in comparator mode would work equally well (or even better, as it would allow higher voltages without amplification, which could be done using the buffer. The CV control was done using a light sensitive resistor and an LED, with the LED being hooked up to the CV. By having one LED forward and one LED backward it was possible to control both with a single jack.


maandag 7 november 2022

Mosha Eurorack Modules #2: CV Sequencer


The CV Sequencer is a 6 HP module that, as the name implies, sequences control voltages in the range of 0V to 10V in either 15 or 16 steps. The switch has three settings: 15 step playback (top), 16 step playback (middle) or record (bottom). Record mode can also be activated using a CV in the top right jack, so it can modify its own content.

The yellow button can be used to step through, and the jack next to it allows an external clock signal as well. The purple jack is the actual CV that is recorded, but a manual voltage can be supplied with the dial.

Outputs are hexagonal, and the purple output is the actual CV output. The jack next to it is the gate output, which normally should follow the clock. Below are the two indicator LED. The right indicator cycles through 8 different colors for 8 of the 16 steps, the magenta LED on the left has two purposes: it both tracks the other 8 steps, and the fact that the module is in record mode.

The sequencer is built around the PIC16F684 microcontroller with the following pin configuration:

Analog input: voltage to be sampled (RA0, pin 13)
Digital input: clock (RA2, pin 11)
Digital input: write (RA3, pin 4)
PWM output: voltage result (RC5, pin 5)
Gate out (RA1, pin 12)
LED out (RC0, RC1, RC2, RC3, pin 10, 9, 8, 7)
Rhythm select in (RC4, pin 6)
20 MHz crystal: RA5 (pin 2) RA4 (pin 3)

The inputs are merely protected by resistors, there are no protection diodes. The ones inside the PIC16F684 work well enough. The analog input has a jumper that allows halving the voltage using a 1% resistor ladder and buffered to ensure that the impedance is below 10k. 

The PWM output goes through a two-pole RC (100k, 4.7nF) filter network with buffer where the second stage of the buffer is shown in the circuit below. It has a trim pot at the bottom of the module that allows the output to be amplified by 1x to 2.1x. As usual, all OPAMP are the TL074, not the TL081.

The jumper and the trimpot together allow the sequencer to work with a highly accurate 0-5V or a slightly less accurate 0-10V.

The code for the sequencer is available here. The analog imput is sampled multiple times and averaged, to ensure that the lower bits of the value are accurate as well.

zondag 6 november 2022

Mosha Eurorack modules #1: Triple LFO

The triple LFO is a 6 HP module that, as the name implies, as three LFO. 
  • The silver LFO has a -5V to 5V triangle output, a -5V to 5V square wave output and a 0V to 5V square wave output and has a medium speed (~2s to 0.2s).
  • The purple LFO only has a -5V to 5V triangle output and a slow speed (~20s to 2s).
  • The golden LFO has a -5V to 5V triangle output that can be attenuated with the second knob, and a 0V to 5V triangle output. Each of the LFO has an LED indicator that switches between red and green.
The design is based on the Simple LFO design from David Haillant. Modifications include having three different capacitor values, the replacement of the lower bound resistor with a 1.5k instead of a 470 Ohm resistor and having a fixed output path. What wasn't fixed is the missing 1k Ohm resistor at the output, so shorting the LFO can cause it to reset. For the 0V to 5V square wave a diode was added and a pulldown resistor.

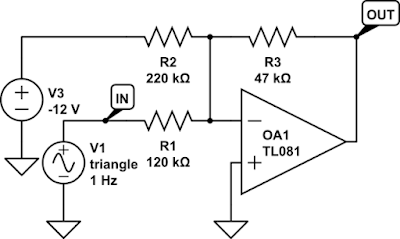
For the 0V to 5V triangle wave the circuit below was added, which basically is an inverting amplifier that adds approximately -5V to the output of the LFO. This causes the LFO to fluctuate between -10V and 0V. The amplifier divides this by 2 and inverts it, resulting in 0V to 5V. Although the circuit mentions the TL081 the entire LFO was built using TL074.